How to Use Wordpress and Hostgator to Host a Blog on Your Own Domain ToughNickel

How to Add a Custom Domain on Blogger
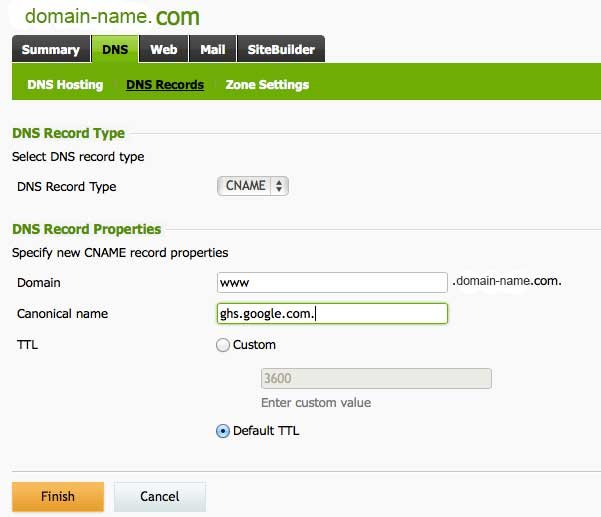
Custom domain setup in Blogger.com is used to create your own blog URL. (for example: from myblog.blogspot.com to myblog.com).. When you purchase a domain from Godaddy.com, they assign an IP address (A record and CNAME record) for the domain.Hence, you need to change those records to point to your Blogger.com blog. This post can help you to change the A and CNAME records of your Godaddy account.

Cara Setting HTTPS Domain TLD Blogger Solusi Menarik
Set up the website pages, navigation bar, logo, colors and fonts, and sidebar. Add extensions for SEO, contact forms, spam protection, and speed optimization. Create a content strategy to serve as.
How to set up a custom domain on Blogger
To add a blog author, enter the email address of the person you want to add. After they accept the invitation, they'll be listed as an author. You can add up to 100 total members (authors, administrators, or readers) to your blog. Important: A Google account is needed to manage and post to blogs.
How to Create Blogger Blog with Custom Domain?
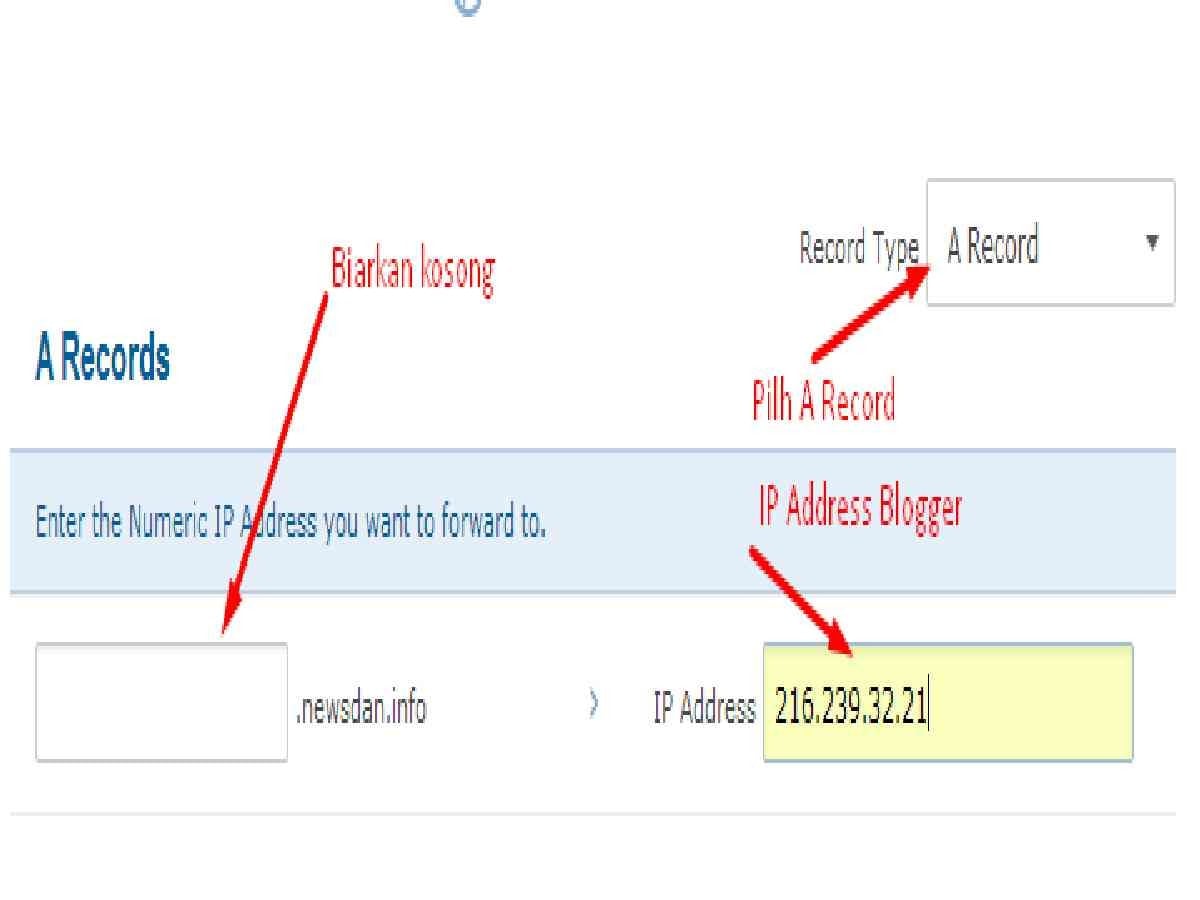
To fix this, you'll have to set up a redirect from the non-www to the www version of your domain. It's also very easy to set up a non-www to www redirect for your Blogger's custom domain. You just need to add 4 A records in your domain's DNS settings that point to the following IPs: 216.239.32.21; 216.239.34.21; 216.239.36.21; 216.239.38.21
How to Setup a Custom Domain in Blogger (2023) TalkBitz
After writing my "Blogger vs. WordPress" post a short while ago, I was surprised to see that some people didn't know you could set up a custom domain name on your Blogger account to make your blog your own. By the way, if you're just getting started with your blog and haven't read my complete guide to creating a blog, check that out!. You don't have to be stuck with a.

How to setup Custom Domain for blogspot blogs?
1. Set up your domain in your Blogger account as described here in Step 2: Connect to your non-Google domain from Blogger. 2. Once you have added the domain, you will get two CNAME records that you need to configure along with the A records in your Namecheap account: - Sign in to your Namecheap account. - Select Domain List from the left.

How To Add Custom Domain To Blogger Set Up A Custom Domain To Your Blogger Blog YouTube
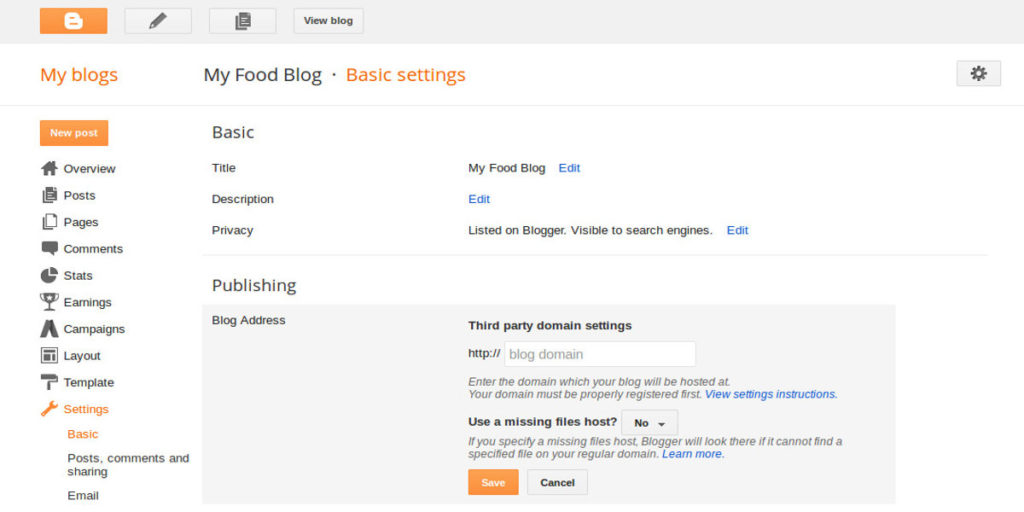
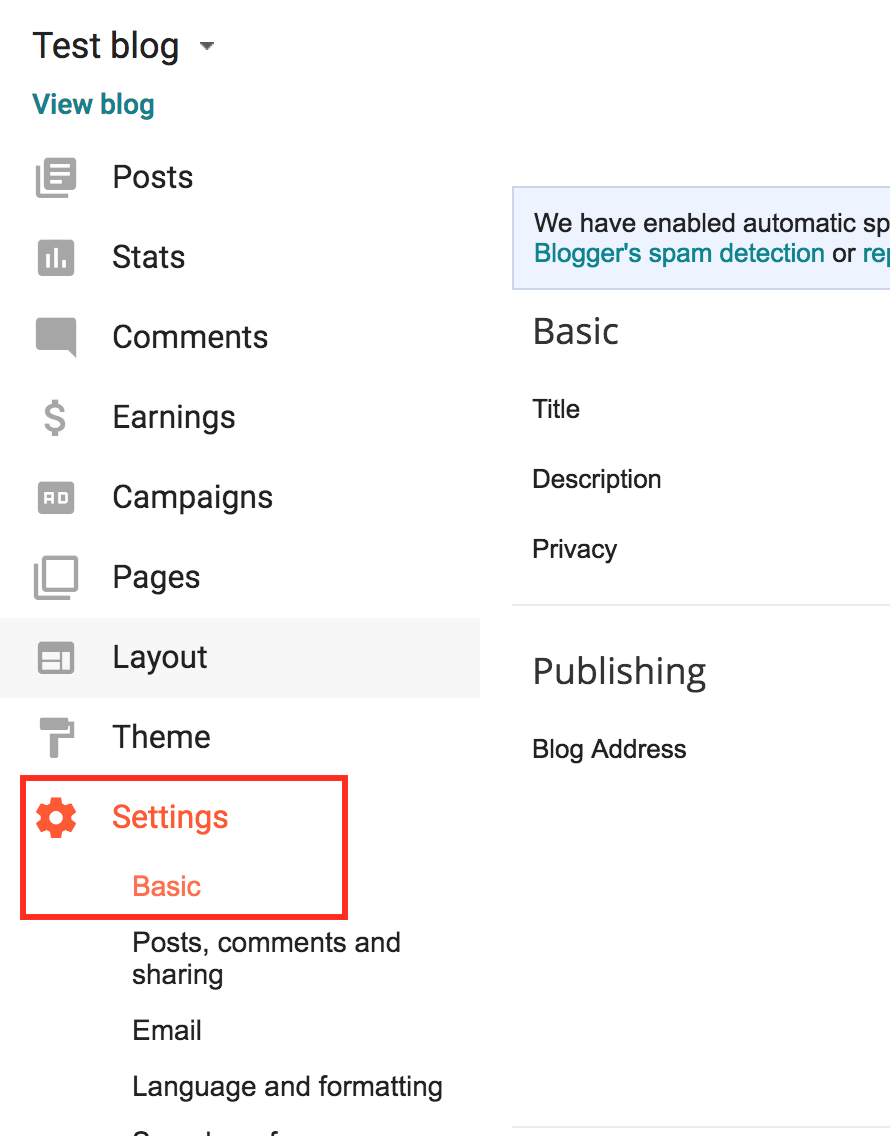
First, login to your Blogger account and go to your blog dashboard. Click Settings option from the sidebar menu and then you will be moved to the Basic Settings. Under Publishing, click the "Setup third-party url for your blog" link next to the Blog Address option. Now enter your custom domain URL and tap the "Save" button.
Cara Setting Domain Blogger di Crazy Domains
Select the blog you want to connect with the custom subdomain. Go to the custom domain option in settings, and write the new domain name, like blog.yoursite.com. After that save the settings. And that's it. Your new Blogspot website is now on a custom subdomain. Also, turn on the HTTPS availability option for the new subdomain.
How to use your domain with your Blogger account DomainsFoundry
Whatever you put on the other side of the dot tells readers what your blog's about. Tips for picking a domain name for your blog. Picking a domain name is basically a process of typing various combinations of words into the domain search box until you find one you like. A few tips: Make it memorable and easy to type. Keep it short.
Set up Custom Domain For Blog Blogger Tutorials Recode Hive
I f your domain is registered with a company other than Blogger, follow the instructions below to create a CNAME record. This process takes about 24 hours for newly-purchased domains. What a CNAME is. A CNAME, or Canonical Name, is an entry within the Domain Name System (DNS) that specifies where someone can find your web pages.
How to Use A Custom Domain In Blogger
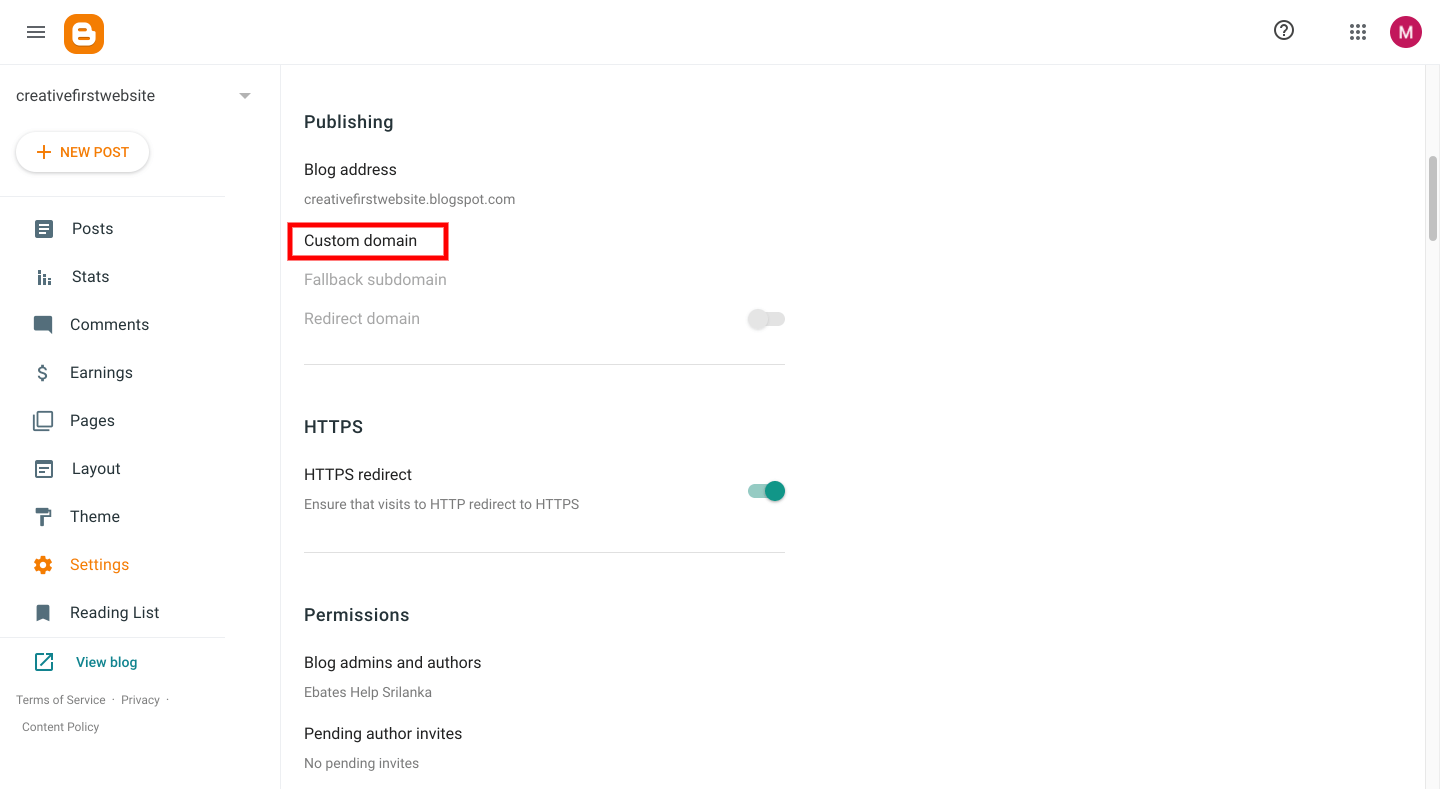
Set up your domain in Blogger. Sign in to Blogger. At the top left, select a blog. In the left menu, click Settings. Under "Publishing," click Custom domain . Enter the URL of the domain that you bought. Click Save. Blog CNAME: For name, enter the name as the subdomain, like "blog." or "www."
How to Use Wordpress and Hostgator to Host a Blog on Your Own Domain ToughNickel
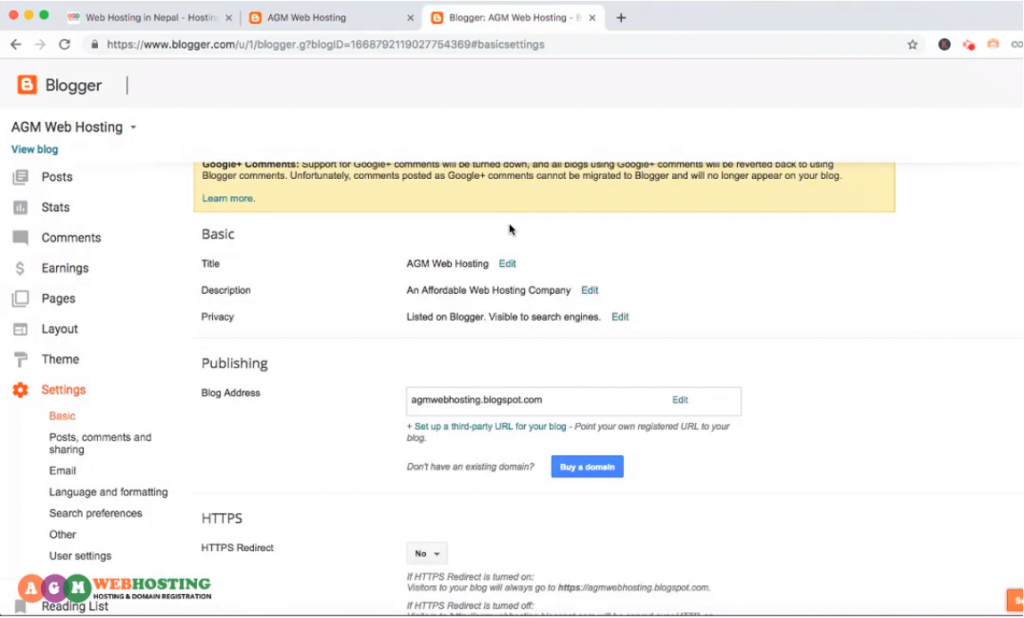
After purchasing a domain name, visit the Blogger dashboard and follow the steps: Click on the Settings button. Scroll down the page to Publishing Section. Click on Custom Domain. Blogger Domain Name Settings. Enter the domain name recently bought. Click on the Save button to generate CNAMEs.
Setting Up your Custom Domain for Blogger with GoDaddy Kristen Doyle The Savvy Teacher Seller
1. To find the required CNAME records, navigate to your blog's Settings → Custom domain section. 2. On the settings page, enter your domain name and click on Save. Note that the domain name must be entered with the www subdomain. 3. After that, a screen with the two required CNAME records will appear. 4.

Custom Domain Connect to Blogger Google Domains to Blogger Settings YouTube
Go ahead and click on the create button for Blogger tab which brings you with two options - " Create " and " Connect Existing Blog ". See the screenshot below. If you want to create a new blog for the domain, go ahead with Create option and it will take you onto the blogger dashboard page where you can choose your title, address, and.
How To Set Up a Custom Domain in Blogger The Right Way! Wonder Forest
Under "Blog Powered by Blogger," click Continue Start with Blogger. Follow the directions on Blogger. Tip: Updates may take up to 48 hours to take effect. Connect an existing blog to your domain. To connect a blog that already exists to your domain in Blogger, learn how to set up a custom domain. To connect your blog to your domain in.

Setting Manage DNS untuk Custom Domain Blogger
3. Set up a custom domain in Blogger. Set up a custom domain in Blogger. Next, log in to your Blogger account and go to the settings for your blog. In the settings, you will find an option to add a custom domain. Enter the domain name you purchased and click on the "Save" button. 4.